Step by Step Guide on How to Convert a FastAPI App into an MCP Server
FastAPI-MCP is a zero-configuration tool that seamlessly exposes FastAPI endpoints as Model Context Protocol (MCP) tools. It allows you to mount an MCP server directly within your FastAPI app, making integration effortless.
In this tutorial, we& explore how to use FastAPI-MCP by converting a FastAPI endpoint—which fetches alerts for U.S. national parks using the National Park Service API—into an MCP-compatible server. We’ll be working in Cursor IDE to walk through this setup step by step.
Step 1: Setting up the environment
National Park Service API
To use the National Park Service API, you can request an API key by visiting and filling out a short form. Once submitted, the API key will be sent to your email.
Make sure to keep this key accessible—we’ll be using it shortly.
Cursor IDE Installation
You can download the Cursor IDE from. It is built specifically for AI-assisted development. It’s free to download and comes with a 14-day free trial .
Python Dependencies
Run the following command to download the required libraries:
Copy Code Copied Use a different Browser
pip install fastapi uvicorn httpx python-dotenv pydantic fastapi-mcp mcp-proxy
Step 2: Creating the FastAPI app
We will be creating a simple FastAPI app that uses the National Park Service API to give alerts related to US National Parks. Later we will convert this app into an MCP server.
First create a .env file and store your API key
Copy Code Copied Use a different Browser
NPS_API_KEY=
Replace with the one you generated.Now, create a new file named and paste the following code. This will serve as the core logic of your application:
Copy Code Copied Use a different Browser
from fastapi import FastAPI, HTTPException, Query
from typing import List, Optional
import httpx
import os
from dotenv import load_dotenv
from fastapi_mcp import FastApiMCP
# Load environment variables from .env file
load_dotenv()
app = FastAPI(title=»National Park Alerts API»)
# Get API key from environment variable
NPS_API_KEY = v(«NPS_API_KEY»)
if not NPS_API_KEY:
raise ValueError(«NPS_API_KEY environment variable is not set»)
@(«/alerts»)
async def get_alerts(
parkCode: Optional[str] = Query(None, description=»Park code (e.g., ‘yell’ for Yellowstone)»),
stateCode: Optional[str] = Query(None, description=»State code (e.g., ‘wy’ for Wyoming)»),
q: Optional[str] = Query(None, description=»Search term»)
):
«»»
Retrieve park alerts from the National Park Service API
«»»
url = »
params =
«api_key»: NPS_API_KEY
# Add optional parameters if provided
if parkCode:
params[«parkCode»] = parkCode
if stateCode:
params[«stateCode»] = stateCode
if q:
params[«q»] = q
try:
async with httpx.AsyncClient() as client:
response = await (url, params=params)
_for_status()
return ()
except httpx.HTTPStatusError as e:
raise HTTPException(
status_code=s_code,
detail=f»NPS API error: »
)
except Exception as e:
raise HTTPException(
status_code=500,
detail=f»Internal server error: str(e)»
)
if __name__ == «__main__»:
import uvicorn
(app, host=»0.0.0.0″, port=8000)
Step 3: Testing the FastAPI app
To test the app, run the following command in the terminal:
Copy Code Copied Use a different Browser
python
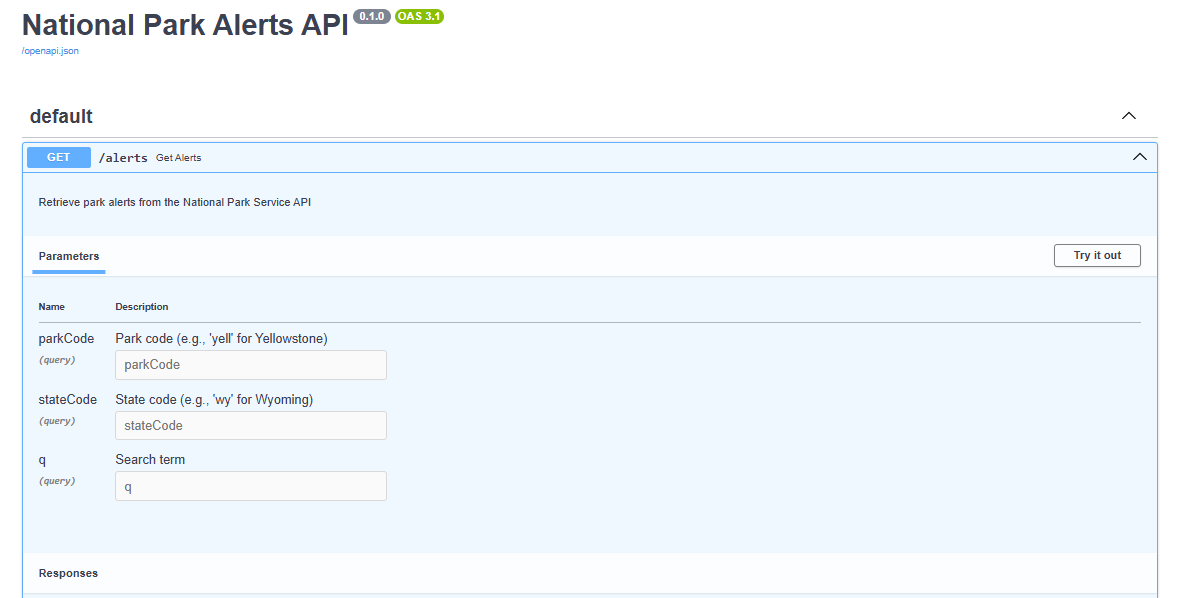
Once the server is running, open your browser and go to: . This will open an interface where we can test our API endpoint
Click on the “Try it out” button.
In the park_code parameter field, enter &; (for California parks).
Click “Execute” .
You should receive a 200 OK response along with a JSON payload containing alert information for national parks in California.
Step 4: MCP Server Implementation
To do this, add the following code just before the if __name__ == & block in your file:
Copy Code Copied Use a different Browser
mcp = FastApiMCP(
app,
# Optional parameters
name=»National Park Alerts API»,
description=»API for retrieving alerts from National Parks»,
base_url=»http://localhost:8000″,
)
()
.
Alternatively, you can copy the following code and replace your with the same:
Copy Code Copied Use a different Browser
from fastapi import FastAPI, HTTPException, Query
from typing import List, Optional
import httpx
import os
from dotenv import load_dotenv
from fastapi_mcp import FastApiMCP
# Load environment variables from .env file
load_dotenv()
app = FastAPI(title=»National Park Alerts API»)
# Get API key from environment variable
NPS_API_KEY = v(«NPS_API_KEY»)
if not NPS_API_KEY:
raise ValueError(«NPS_API_KEY environment variable is not set»)
@(«/alerts»)
async def get_alerts(
parkCode: Optional[str] = Query(None, description=»Park code (e.g., ‘yell’ for Yellowstone)»),
stateCode: Optional[str] = Query(None, description=»State code (e.g., ‘wy’ for Wyoming)»),
q: Optional[str] = Query(None, description=»Search term»)
):
«»»
Retrieve park alerts from the National Park Service API
«»»
url = »
params =
«api_key»: NPS_API_KEY
# Add optional parameters if provided
if parkCode:
params[«parkCode»] = parkCode
if stateCode:
params[«stateCode»] = stateCode
if q:
params[«q»] = q
try:
async with httpx.AsyncClient() as client:
response = await (url, params=params)
_for_status()
return ()
except httpx.HTTPStatusError as e:
raise HTTPException(
status_code=s_code,
detail=f»NPS API error: »
)
except Exception as e:
raise HTTPException(
status_code=500,
detail=f»Internal server error: str(e)»
)
mcp = FastApiMCP(
app,
# Optional parameters
name=»National Park Alerts API»,
description=»API for retrieving alerts from National Parks»,
base_url=»http://localhost:8000″,
)
()
if __name__ == «__main__»:
import uvicorn
(app, host=»0.0.0.0″, port=8000)
Next, you& need to register your FastAPI MCP server in Cursor.
Open Cursor and navigate to:
File > Preferences > Cursor Settings > MCP > Add a new global MCP server
This will open the configuration file.
Inside that file, add the following entry and save it:
Copy Code Copied Use a different Browser
«mcpServers»:
«National Park Service»:
«command»: «mcp-proxy»,
«args»:
Step 5: Running the server
Now run the app using the following command:
Copy Code Copied Use a different Browser
python
Once the app is running, navigate to File > Preferences > Cursor Settings > MCP. You should now see your newly added server listed and running under the MCP section.
You can now test the server by entering a prompt in the chat. It will use our MCP server to fetch and return the appropriate result.
Also, don’t forget to follow us on and join our and . Don’t Forget to join our .
[
The post appeared first on .