A Code Implementation for Advanced Human Pose Estimation Using MediaPipe, OpenCV and Matplotlib
Human pose estimation is a cutting-edge computer vision technology that transforms visual data into actionable insights about human movement. By utilizing advanced models like MediaPipe& BlazePose and powerful libraries such as OpenCV, developers can track body key points with unprecedented accuracy. In this tutorial, we explore the seamless integration of these, demonstrating how Python-based frameworks enable sophisticated pose detection across various domains, from sports analytics to healthcare monitoring and interactive applications.
First, we install the essential libraries:
Copy Code Copied Use a different Browser
!pip install mediapipe opencv-python-headless matplotlib
Then, we import the important libraries needed for our implementation:
Copy Code Copied Use a different Browser
import cv2
import mediapipe as mp
import t as plt
import numpy as np
We initialize the MediaPipe Pose model in static image mode with segmentation enabled and a minimum detection confidence of 0.5. It also imports utilities for drawing landmarks and applying drawing styles.
Copy Code Copied Use a different Browser
mp_pose =
mp_drawing = ng_utils
mp_drawing_styles = ng_styles
pose = mp_pose.Pose(
static_image_mode=True,
model_complexity=1,
enable_segmentation=True,
min_detection_confidence=0.5
)
Here, we define the detect_pose function, which reads an image, processes it to detect human pose landmarks using MediaPipe, and returns the annotated image along with the detected landmarks. If landmarks are found, they are drawn using default styling.
Copy Code Copied Use a different Browser
def detect_pose(image_path):
image = d(image_path)
image_rgb = Color(image, cv2.COLOR_BGR2RGB)
results = ss(image_rgb)
annotated_image = image_()
if _landmarks:
mp__landmarks(
annotated_image,
_landmarks,
mp_pose.POSE_CONNECTIONS,
landmark_drawing_spec=mp_drawing__default_pose_landmarks_style()
)
return annotated_image, _landmarks
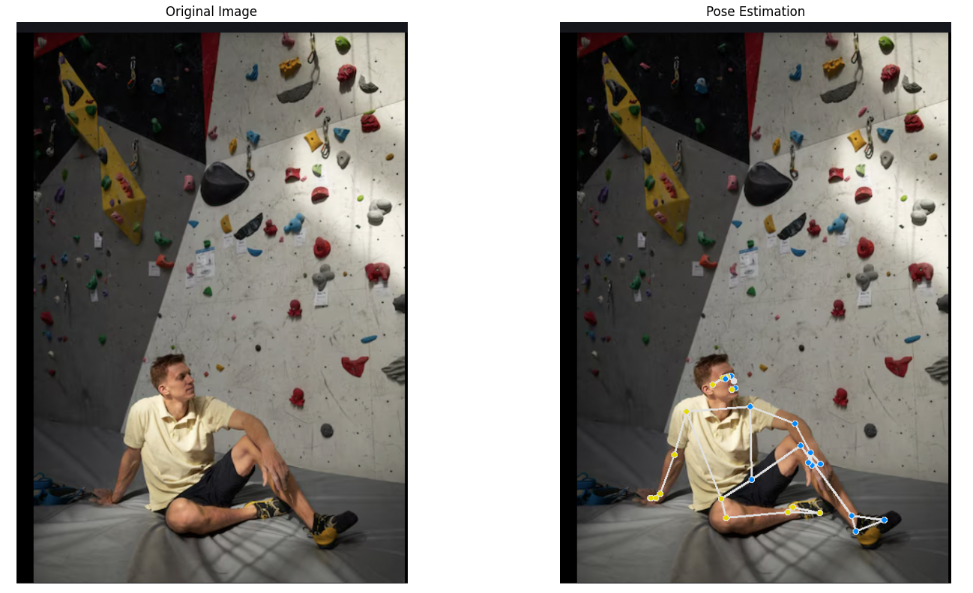
We define the visualize_pose function, which displays the original and pose-annotated images side by side using matplotlib. The extract_keypoints function converts detected pose landmarks into a dictionary of named keypoints with their x, y, z coordinates and visibility scores.
Copy Code Copied Use a different Browser
def visualize_pose(original_image, annotated_image):
e(figsize=(16, 8))
ot(1, 2, 1)
(‘Original Image’)
w(Color(original_image, cv2.COLOR_BGR2RGB))
(‘off’)
ot(1, 2, 2)
(‘Pose Estimation’)
w(annotated_image)
(‘off’)
_layout()
()
def extract_keypoints(landmarks):
if landmarks:
keypoints =
for idx, landmark in enumerate(ark):
keypoints[mp_pose.PoseLandmark(idx).name] =
‘x’: landmark.x,
‘y’: landmark.y,
‘z’: landmark.z,
‘visibility’: ility
return keypoints
return None
Finally, we load an image from the specified path, detect and visualize human pose landmarks using MediaPipe, and then extract and print the coordinates and visibility of each detected keypoint.
Copy Code Copied Use a different Browser
image_path = ‘/content/Screenshot 2025-03-26 at 12.56.05 AM.png’
original_image = d(image_path)
annotated_image, landmarks = detect_pose(image_path)
visualize_pose(original_image, annotated_image)
keypoints = extract_keypoints(landmarks)
if keypoints:
print(«Detected Keypoints:»)
for name, details in ():
print(f»name: details»)
Sample Processed Output
In this tutorial, we explored human pose estimation using MediaPipe and OpenCV, demonstrating a comprehensive approach to body keypoint detection. We implemented a robust pipeline that transforms images into detailed skeletal maps, covering key steps including library installation, pose detection function creation, visualization techniques, and keypoint extraction. Using advanced machine learning models, we showcased how developers can transform raw visual data into meaningful movement insights across various domains like sports analytics and healthcare monitoring.
Here is the . Also, don’t forget to follow us on and join our and . Don’t Forget to join our .
The post appeared first on .
#ArtificialIntelligence #MachineLearning #AI #DeepLearning #Robotics